Our picture hosting should work now Cwis so ewe can post em straight into the thread....then they wont get lost ![]() but gallery should also be workin. Any problemos, lettuce snow.
but gallery should also be workin. Any problemos, lettuce snow.

Valve Clearance Check
#41

Posted 28 August 2014 - 10:24 am
If you want to mark your location on the Carpe map: http://www.carpe-tdm...opic.php?t=5117
Doin valve clearances? Use dappers valve shim exchange program and the job will be carroty - Free (other than you postin me yer shims) for sporting members.
Active member of TPLQHCSRSFC and TSRMCMAS (even though a year off) and avid fan of PM not sent.
#42

Posted 11 September 2014 - 09:39 pm
Hi,
just a update for those like me who have a 900 and are looking at a 850 description on how to do it.
Must admit now I have done it and replaced 4 shims it is daunting but once your committed to do it, its not so bad.
Lessons I learned, get a new washer for the top coolant pipe from Fowlers, anti-free because you will loose some. liquid gasket, engineering feeler gauge, cable ties, micrometer. HT spray paint and a roll of wall paper.
The roll of wall paper is to put all the parts on, in the order you took them off and write on where its from / draw a diagram.
Its a bit more cramped on a 900 and there is more bolts on the top,
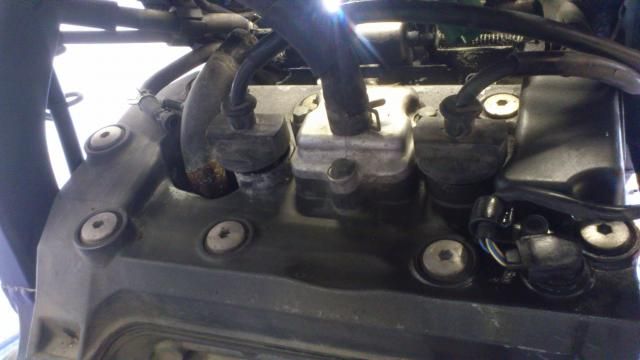
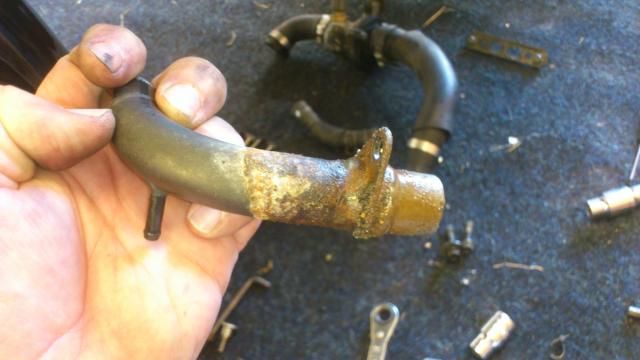
The top water pipe was very corroded and hard to get out, washed was knackered and I was shocked at the state of the pipe.
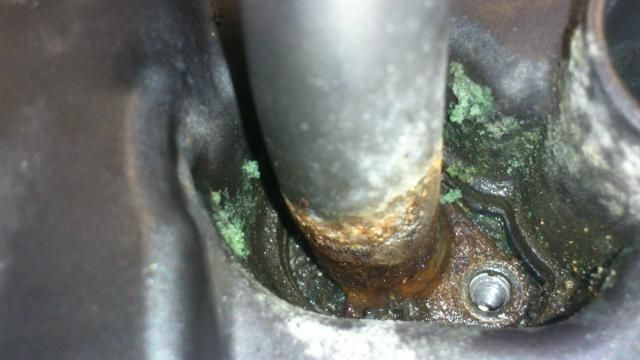
I ended up spraying it.
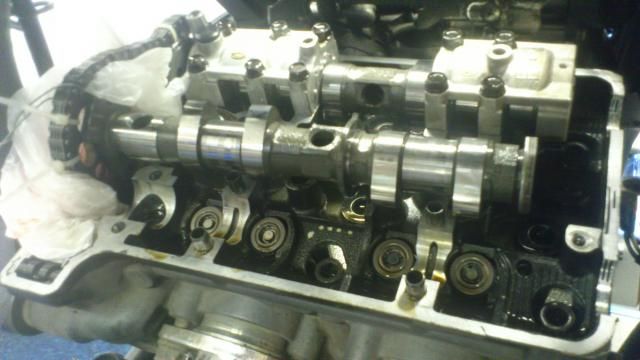
I cable tied the timing chain to the sprockets so I did not loose the place on the timing.
This is the pipe back in with a new Yamaha washer and some liquid gasket
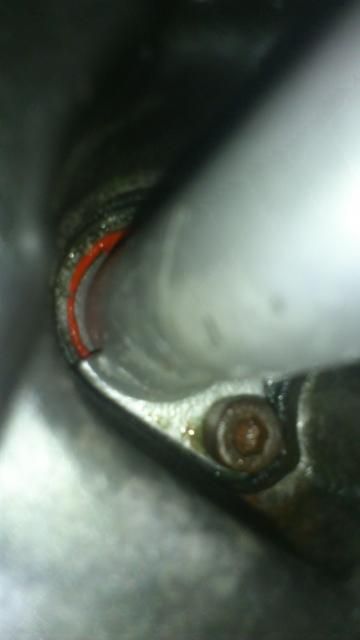
Took ages cleaning the hole of all the crap to get a good clean fix.
It was a ball ache but worth it to say I know its been done. I could imagine that a lot of garages would just say they had done it and take that cash.
I used Dappers shim service ---- highly recommended.
I asked lee Henety for some advice to do it and the kind man sent me this below. Thanks Lee.
Have a good read.
Cheers, Ivan
You won't know what shims you need until you take them out. It's easier for me on fettle days, as I have a full shim kit to hand.
When you take the cams out you have to set the engine to TDC on cyl 1.
Take out the two inspection port covers on the left side of the engine.
Turn the centre nut (19mm) anti clockwise, until you see two vertical marks approaching. These are the firing marks.
Turn it a bit more and you will see a vertical mark with the 'T' lying on it's side. This is TDC. Now look at the cams next to the sprockets, you should see two small dots on top of the cam just inside from where the cam sprocket is fixed on.
If these are not visible you are 360 degrees out on the crank so go round one full turn anti clockwise from where you are back to the TDC mark.
Do not under any circumstances, undo the bolts holding the sprockets to the cam shafts. It's not needed. If you do, you will cause yourself no end of hassle resetting the cams to the sprockets.
The exhaust cam will not be under load at this point, but the inlet cam is pushing down valves on CYL 2. Remove cam tensioner. Tie a wire through the cam chain to stop you losing it down the tunnel. Take out exhaust cam by undoing caps. Do not move the crank from now on.
On the INLET cam.
You MUST undo the left side cam cap over CYL 1 FIRST, or the valves pushing up from CYL 2 will bend the cam shaft.
Do not interchange bolts with other cam caps. The arrows on top of the cam caps must point to the sprockets when putting them back and caps must go back where they came from.
There are two rubber bungs in the top of the two cam caps nearest the sprockets. Do not lose these as they direct oil around the head.
It is vital that you keep everything spotlessly clean. Block the cam chain tunnel with clean rag before you pull out any buckets. Use a magnet on a stick to pull out the buckets this will keep the shims inside the buckets.
Look at shim number do the sums and aim for the higher end of the gap range by fitting a smaller shim. They always close up. Fit shims with number uppermost tapping down with a small hammer and a piece of brass rod to make sure they are seated, they will be a very snug fit.
When putting Cams back, put in exhaust cam first, setting the cam to the EX marks are level with the side of the engine and the DOT is facing upppermost.
Make sure the chain is tight from the crank on the front side of the sprocket nearest the front of the engine.
Fit cam caps making sure the locating ring which runs in a groove is engaged. Tighten bolts on cam caps starting from sprocket end. They must be 10Nm so use a decent torque wrench. Fitting the inlet is awkward as the lobes on the cyl 2 end touch the valves.
Make sure the DOT is uppermost.
Fit the chain on being sure it is tight from the exhaust cam in the middle and making sure the two IN marks are level.They may not be absolutely level due to wear in the cam chain, but it will be obvious you are not a tooth out.
Fit the cam cap nearest the sprocket and tighten down in a criss cross pattern carefully. Fit the other cam cap loosely to locate the cam. The dowels must engage the cap don't force it. Once the cap is down snug tighten the other cap and then finally tighten all bolts to 10 Nm.
Wind in the cam tensioner with a small screw driver clockwise to close it. You may find making a T shaped bit of metal to fit the slot and engage the cross slots in the body useful to hold it closed. Use an old feeler of about 0.5 to 1mm and grind it.
Refit tensioner pull out your bit of metal. the tensioner will spring out to take up the slack. Use your spanner on the centre crank bolt to turn the engine anti clockwise through two full turns back to TDC. Check all the marks line up again and nothing goes tight.
Reassemble engine taking care to see the two middle seals on the cover stay in place.
Put it all back together, hold breath start engine and go have a well deserved beer.
Regards,
Lee H
Edited by Geordie Guy, 11 September 2014 - 10:06 pm.
Kawasaki GT550, XJ900 Diversion, 2002 TDM 900 , 2008 TDM 900a, 2010 TDM 900a.
#43

Posted 11 September 2014 - 09:42 pm
Hello all. My 2001 TDM850 has 23k on and is due a valve check and service and I wondered if anyone could recommend someone in the West Midlands/ Worcestershire area ??? I am worried about attempting it myself and have had a few quotes locally but they have ranged from £400 to £1200. I am happy to pay for the job to be done properly but got the impression from a lot of the dealers that they didn't really want to do it. I hope someone can help.
Regards
Paul
#44

Posted 12 September 2014 - 09:01 am
![]() Sorry I can't help with recommending anyone in your area, just wanted to say that there's no panic if the valve check isn't done at the exact mileage. It'll be ok if you go over 24k if it gives you time to source a decent mechanic. You could probably save quite a bit if you did the service yourself and just got the valves checked/adjusted by a mechanic.
Sorry I can't help with recommending anyone in your area, just wanted to say that there's no panic if the valve check isn't done at the exact mileage. It'll be ok if you go over 24k if it gives you time to source a decent mechanic. You could probably save quite a bit if you did the service yourself and just got the valves checked/adjusted by a mechanic.
Mk2a 2000 in Silver. Top end Refurb @ 41100 miles, Scottoiler, Renthal Road High Bars, Up & Back Bar Risers, Bellypan, DL650 Handguards, Capt. Picard Bar Ends, House of Henty SS Wheel spacers, New Seat Cover Fitted. 58 MPG !! Now owned by chrisbee ! Studley's mk2a Bloggerydoodaah ! Photos of my first MK1 Photos of my MK2a TPLQHCSRSFC No. 1 Fan
#45

Posted 03 October 2014 - 10:58 am
Can I just check looks like the valve clearances shown are for an 850, are they the same for a 900?
#46

Posted 03 October 2014 - 11:20 am
Can I just check looks like the valve clearances shown are for an 850, are they the same for a 900?
Yep will work for the 900, read post above also #42, this was a 900.
Bigred mk1 R1 Calipers- Braided lines- Givi wing rack-Crash bungs- Hi vis bullets-PR2's- and a hoot to ride.
Quad 900 Silver Laser duo tech pipes-Scott oiler-Engine crash bars- Radiator mounted see me ring LED's-Datatool system 3 alarm -Centre stand- Extender fender-Renthal bars-Handle bar risers-Mirror extenders-BMW GS Handgaurds-Acumen uprated horn & Nautilus-Stainless steel Radiator guard-Givi wing rack-OEM screen-Yammy touring screen-MRA Vario-MRA Double bubble cut down for fast as fk riding-Tiger screen-Tank protector-Stomp grip panels-Optimate lead Gone to Heaven ![]()
1991 MK1 in need of some TLC watch this space Gone to Heaven ![]() Sorted and on the Road Mick
Sorted and on the Road Mick ![]()
![]() it's the bike that Jack built
it's the bike that Jack built ![]()
![]()
#47

Posted 03 October 2014 - 11:38 am
I'm pretty sure the clearances are different for the 900 to the Mk1, but unfortunately our work IT won't let me see the first page of this thread to check what's there.
Clearances for a 900:
Inlet 0.15-0.2
Exhaust 0.23-0.28
There's a copy of the workshop manual here, clearances are page 2-5
http://www.fieldscie...S_2002_Serv.pdf
Edited by ChrisG, 03 October 2014 - 11:39 am.
1992 Mk1, 76k miles, Hagon springs, MTC exhaust, 4½ gears Gone now ![]()
2009 900 abs, 42k miles, Yamaha heated grips, double bubble screen, R&G crash bungs, scottoiler, Autocom, 1500 lumen LED spotlights.


#48

Posted 03 October 2014 - 05:02 pm
Thanks Guys
The 850 appears to be 0.15-0.2 on the inlet and the exhaust 0.25-0.3 so the 900 is the same for inlet and less than a thou" (in old money) different on the exhaust. Near enough the same I reckon.
#49

Posted 04 October 2014 - 10:42 am
Just out of interest-- burcotpaul says he had a quote for a vavle check of £400 to £1200, none of my stuff ever goes in a bike shop, but is that a fair price for that sort of work?
#50

Posted 04 October 2014 - 11:29 am
Fair enough for the Dealer ![]()
Growing old is compulsory, growing up is optional
Who dies with the most toys wins!
2010 'stealth' grey 900. '14 plate. engine bars, Centre stand, datatool alarm, datatag, E22s, Cree DRLs, Barkbuster handguards, Carpe sticker. Led running lights
#51

Posted 04 October 2014 - 11:32 am
That seems like a hell of a lot to me. The 900 takes a bit longer but on my Mk1 I could do it in about 2.5 hours or so, and the only parts they need are shims and coolant.
1992 Mk1, 76k miles, Hagon springs, MTC exhaust, 4½ gears Gone now ![]()
2009 900 abs, 42k miles, Yamaha heated grips, double bubble screen, R&G crash bungs, scottoiler, Autocom, 1500 lumen LED spotlights.


#52

Posted 05 October 2014 - 09:43 am
When can I start ? Split the difference and I'll be happy to check and adjust any TDM valve clearances for £800. ![]() Will travel at short notice too.
Will travel at short notice too. ![]()
Mk2a 2000 in Silver. Top end Refurb @ 41100 miles, Scottoiler, Renthal Road High Bars, Up & Back Bar Risers, Bellypan, DL650 Handguards, Capt. Picard Bar Ends, House of Henty SS Wheel spacers, New Seat Cover Fitted. 58 MPG !! Now owned by chrisbee ! Studley's mk2a Bloggerydoodaah ! Photos of my first MK1 Photos of my MK2a TPLQHCSRSFC No. 1 Fan
#53

Posted 05 October 2014 - 01:57 pm
#54

Posted 05 October 2014 - 07:13 pm
Doing my valves at the moment got shims comming from here--Daplap away at present.
http://www.ebay.co.u...=STRK:MEBIDX:IT
#55

Posted 10 November 2014 - 02:10 pm
Got down to doin' the valves on my '02 but need a few shims:
190, 189,192,177,176 and 182......anyone got any knocking about?
#56

Posted 10 November 2014 - 02:15 pm
Got down to doin' the valves on my '02 but need a few shims:
190, 189,192,177,176 and 182......anyone got any knocking about?
Ask dappers if he's still running the pa larkin shimeroobedoothingymabob.
Bigred mk1 R1 Calipers- Braided lines- Givi wing rack-Crash bungs- Hi vis bullets-PR2's- and a hoot to ride.
Quad 900 Silver Laser duo tech pipes-Scott oiler-Engine crash bars- Radiator mounted see me ring LED's-Datatool system 3 alarm -Centre stand- Extender fender-Renthal bars-Handle bar risers-Mirror extenders-BMW GS Handgaurds-Acumen uprated horn & Nautilus-Stainless steel Radiator guard-Givi wing rack-OEM screen-Yammy touring screen-MRA Vario-MRA Double bubble cut down for fast as fk riding-Tiger screen-Tank protector-Stomp grip panels-Optimate lead Gone to Heaven ![]()
1991 MK1 in need of some TLC watch this space Gone to Heaven ![]() Sorted and on the Road Mick
Sorted and on the Road Mick ![]()
![]() it's the bike that Jack built
it's the bike that Jack built ![]()
![]()
#57

Posted 10 November 2014 - 02:34 pm
Ask dappers if he's still running the pa larkin shimeroobedoothingymabob.
Rog'
#58

Posted 10 November 2014 - 03:25 pm
Got down to doin' the valves on my '02 but need a few shims:
190, 189,192,177,176 and 182......anyone got any knocking about?
Prolly better to post up a request in the Wanted section, rather than the Knowledge Base section. ![]()
Mk2a 2000 in Silver. Top end Refurb @ 41100 miles, Scottoiler, Renthal Road High Bars, Up & Back Bar Risers, Bellypan, DL650 Handguards, Capt. Picard Bar Ends, House of Henty SS Wheel spacers, New Seat Cover Fitted. 58 MPG !! Now owned by chrisbee ! Studley's mk2a Bloggerydoodaah ! Photos of my first MK1 Photos of my MK2a TPLQHCSRSFC No. 1 Fan
#59

Posted 10 November 2014 - 04:14 pm
Prolly better to post up a request in the Wanted section, rather than the Knowledge Base section.
Done : )
#60

Posted 15 March 2015 - 06:32 pm
I'm halfway thru' my valve check @ 26,400 - its first. Only one inlet is tight (#1 on JBX's calculator) but three of the four exhausts (1,2,4). I've ordered new shims from MickC's link above - the 9.48mm diameter is correct. Comments on here, particularly those about camshaft caps by Mr Henty as reported by GeordyGuy @ post #42 above, have been very helpful. GG's coolant pipe notes helped too - mine is just the same.
I have questions not answered by the factory manual:
1. Is a new cover gasket really necessary? Mine seems in good condition.
2. Is sealant necessary for the gasket? Mine had none on when stripped, unless a sight amount of goo in the cover groove was it.
3. If sealant is required, what to use apart from the Yamaha bond No. 1215 specified?
4. If sealant is required, where does it go? In the cover groove, on the head rim, or both?
Answers, advice and comments are invited, with my thanks in advance.
Edited by steve27bha, 15 March 2015 - 06:33 pm.
0 user(s) are reading this topic
0 members, 0 guests, 0 anonymous users


